Sparkle and Shine: Christmas Light Nails for Festive Fingertips
The holiday season brings with it a sense of joy, warmth, and an abundance of dazzling lights. This festive spirit doesn’t have to be limited to your home; you can bring it to your fingertips with Christmas light nails. In this article, we’ll explore the delightful world of Christmas light nail art, sharing tips, ideas, and inspiration to help you create a festive and eye-catching manicure that perfectly captures the holiday spirit.
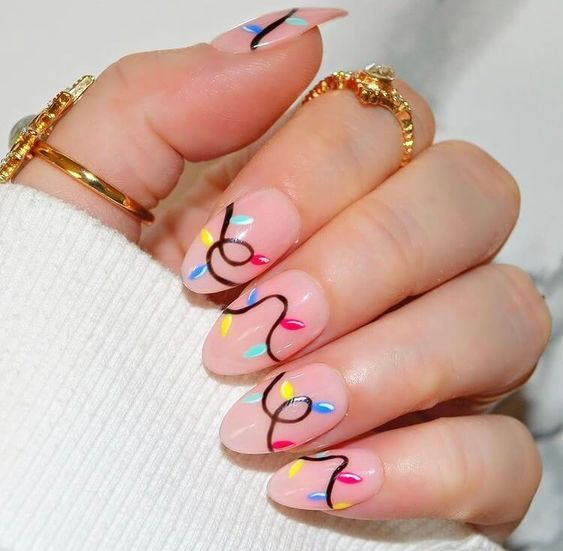
What Are Christmas Light Nails?
Christmas light nails are a creative and playful nail art design that mimics the look of colorful Christmas lights strung together. These nail designs feature tiny bulbs, cords, and various holiday-themed elements to celebrate the season in style. Whether you’re attending holiday parties or simply want to add some festive flair to your daily look, Christmas light nails are the perfect choice.

Getting Started: Tips for Christmas Light Nail Art
Before you dive into creating your Christmas light nail art, consider these helpful tips:
- Prepare Your Nails: Start with clean, well-manicured nails. Trim and shape your nails to your desired length and push back your cuticles. Apply a base coat to protect your natural nails.
- Choose a Color Palette: Select a color palette that captures the holiday spirit. Traditional colors like red, green, and gold work well, but you can also get creative with blues, purples, or even silver.
- Gather Your Supplies: You’ll need nail polish in your chosen colors, a thin nail art brush, a dotting tool or toothpick, and a topcoat for sealing your design.
- Plan Your Design: Before you start painting, plan your Christmas light design. Decide where you want the lights to appear on your nails and how you want them to be arranged.
Creating Your Christmas Light Nail Art
Here’s a step-by-step guide to creating your Christmas light nail art:
- Base Coat: Apply a clear base coat to your nails and let it dry.
- Background Color: Paint your nails with your chosen background color and allow it to dry completely.
- Light Bulbs: Using a thin nail art brush or dotting tool, create small dots along the edges of your nails to represent the light bulbs. You can use different colors for each bulb, just like real Christmas lights. Let the dots dry.
- Cords: With a contrasting color, paint thin lines connecting the light bulbs to create the appearance of cords. You can also add loops and swirls to mimic the way lights are strung together.
- Additional Details: Add extra details like bows, holly leaves, or snowflakes to enhance the festive look.
- Topcoat: Finish your Christmas light nail art with a clear topcoat to seal the design and give your nails a glossy finish.

Ideas and Variations
- Mix and Match: Experiment with different color combinations and patterns on each nail for a fun and eclectic look.
- Accent Nails: Create Christmas light designs on one or two accent nails and complement them with coordinating solid colors on the other nails.
- 3D Elements: For an extra festive touch, consider adding small rhinestones or glitter to represent the sparkle of holiday lights.
- Matte Finish: Opt for a matte topcoat to give your Christmas light nails a unique texture and appearance.
Shine Bright with Christmas Light Nails
In conclusion, Christmas light nails are a delightful way to showcase your holiday spirit and creativity. With a bit of practice and the right tools, you can achieve a festive and eye-catching manicure that captures the magic of the season. Whether you’re attending holiday gatherings or simply want to enjoy the holiday cheer on your fingertips, Christmas light nails are sure to make your manicure merry and bright. So, get ready to shine and spread the joy with this festive nail art!